×
- Hello
- Login or Register
- Quick Links
- Live Chat
- Track Order
- Parts Availability
- RMA
- Help Center
- Contact Us
- Shop for
- Mazda Parts
My Garage
My Account
Cart
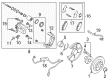
Genuine Mazda MX-5 Miata Brake Disc
Disc Rotor- Select Vehicle by Model
- Select Vehicle by VIN
Select Vehicle by Model
orMake
Model
Year
Select Vehicle by VIN
For the most accurate results, select vehicle by your VIN (Vehicle Identification Number).
5 Brake Discs found

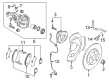
Mazda MX-5 Miata Rotor Part Number: N251-26-251
$81.70 MSRP: $108.95You Save: $27.25 (26%)Ships in 1-2 Business Days

Mazda MX-5 Miata Rotor Part Number: N251-33-251
$81.70 MSRP: $108.95You Save: $27.25 (26%)Ships in 1-2 Business Days
Mazda MX-5 Miata Rotor Part Number: N123-26-251B
$95.68 MSRP: $127.59You Save: $31.91 (26%)Ships in 1-2 Business Days

Mazda MX-5 Miata Rotor Part Number: N12Y-33-25XC
$96.86 MSRP: $129.17You Save: $32.31 (26%)Ships in 1-2 Business Days
Mazda MX-5 Miata Rotor Part Number: NA5F-33-251A
$196.54 MSRP: $262.11You Save: $65.57 (26%)Ships in 1-2 Business Days
Mazda MX-5 Miata Brake Disc
Looking for Brake Disc with proven quality? Choose OEM Brake Disc. Mazda designs and builds them to strict factory specs. Every piece goes through rigorous quality checks. You'll get parts that fit right and work like new. Shop our huge inventory of OEM Mazda MX-5 Miata parts. Enjoy the highly competitive prices online. Our site is your one-stop shop. Each genuine MX-5 Miata part includes a manufacturer's warranty. Buy with confidence. Our return policy is simple and hassle-free. In a rush? Choose expedited delivery at checkout. You'll love the streamlined experience from search to checkout to receiving your order.
Mazda MX-5 Miata Brake Disc Parts and Q&A
- Q: How to properly replace a brake disc on Mazda MX-5 Miata?A:Unscrew the lug nuts of the wheels, lift up the vehicle and place it safely on jack stands. Take out the wheel and replace it with the lug nuts to secure the disc in place, and may use some washers under the nuts to ensure a good fit to the hub. Disassemble by removing the caliper of the brake without disconnecting the Brake Hose and hanging it off (via a piece of wire) after removing the caliper bolts. Examine the disc surface of the disc, both as to score marks and damage, of which light scratches and shallow grooves are normal, deep scoring of more than 0.039-inch (1.0 mm) necessitates refinishing by an automotive machine shop. Inspect the disc on both sides, where serious wear caused by non-replacement of brake pads requires the change of the disc. In order to record disc runout, position a dial indicator on the edge of the disc (approximately 1/2-inch away), position it to zero and rotate the disc at a slow speed; when the reading surpasses the limit, refinishing is necessary. In any case an eventual resurfacing with a smooth finish is advisable to remove the brake pedal pulsation. Unless resurfacing, wipe out any glaze with a swirling motion with emery cloth or sandpaper. Take care not to machine the disc below the minimum thickness specified and which is cast in the inside of the disc and measure the thickness with a micrometer. Unscrew the bracket of the brakes caliper and take off the disc on the hub. Install the new disc on top of the wheel studs, caliper bracket, and screw the bracket bolts up to the required torque. Install the caliper and brakes pads, reattach the wheel and place the vehicle on the ground, tightening the lug nuts up to the required torque. Check the brake fluid level in the system, make adjustments where necessary and press the brake pedal a few times to check the contacts between the disc and the brake pads. The only thing that needs to be done is bleeding when the brake hose is disconnected. Lastly, test the brakes to ensure that they are working properly before a person drives.

Related Mazda MX-5 Miata Parts
 Mazda MX-5 Miata Antenna
 Mazda MX-5 Miata Alternator Bearings
 Mazda MX-5 Miata Brake Light Switches
 Mazda MX-5 Miata Coil Springs
 Mazda MX-5 Miata Control Arm
 Mazda MX-5 Miata Differential Mount
 Mazda MX-5 Miata Fuel Tank
 Mazda MX-5 Miata Rocker Arm
 Mazda MX-5 Miata TPMS Sensor
 Mazda MX-5 Miata Windshield Wiper Motors