×
- Hello
- Login or Register
- Quick Links
- Live Chat
- Track Order
- Parts Availability
- RMA
- Help Center
- Contact Us
- Shop for
- Mazda Parts
My Garage
My Account
Cart
Genuine Mazda Oil Pressure Switch
Oil Pressure Sender Switch- Select Vehicle by Model
- Select Vehicle by VIN
Select Vehicle by Model
orMake
Model
Year
Select Vehicle by VIN
For the most accurate results, select vehicle by your VIN (Vehicle Identification Number).
22 Oil Pressure Switches found

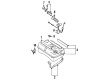
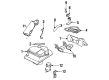
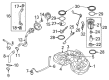
Mazda Oil Pressure Sending Unit Part Number: 1F20-18-501C
$22.20 MSRP: $29.61You Save: $7.41 (26%)Ships in 1-2 Business DaysProduct Specifications- Other Name: Switch, Oil Pressure
- Replaces: CY01-18-501, CY01-18-501A, 1F00-18-501, 1F20-18-501, 1F20-18-501A, 1F20-18-501B

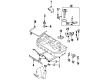
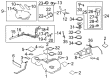
Mazda Oil Pressure Sending Unit Part Number: B367-18-501B
$24.59 MSRP: $32.79You Save: $8.20 (26%)Ships in 1-2 Business DaysProduct Specifications- Other Name: Switch Oil


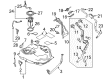
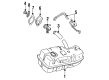
Mazda Oil Pressure Sending Unit Part Number: LF01-18-501A
$17.55 MSRP: $23.41You Save: $5.86 (26%)Ships in 1-2 Business DaysProduct Specifications- Other Name: Switch, Oil Pressure; Oil Gauge Sending Unit
- Replaces: L3H5-18-501, LF01-18-501

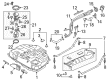
Mazda Oil Pressure Sending Unit Part Number: R207-18-501
$25.00 MSRP: $33.34You Save: $8.34 (26%)Ships in 1-2 Business DaysProduct Specifications- Other Name: Switch Oil


Mazda Oil Pressure Sending Unit Part Number: N201-14-820
$125.28 MSRP: $167.07You Save: $41.79 (26%)Ships in 1-2 Business DaysProduct Specifications- Other Name: Gauge Unit, Oil Pressure


Mazda Oil Pressure Sending Unit Part Number: N3A1-14-820
$163.69 MSRP: $218.30You Save: $54.61 (26%)Ships in 1-2 Business DaysProduct Specifications- Other Name: Gauge Unit, Oil Pressure


Mazda Oil Pressure Sending Unit Part Number: N3A1-10-470A
$165.26 MSRP: $220.39You Save: $55.13 (26%)Ships in 1-2 Business DaysProduct Specifications- Other Name: Sensor
- Replaces: N3A1-10-470

Mazda Oil Pressure Sending Unit Part Number: PE01-18-501B
$32.16 MSRP: $42.89You Save: $10.73 (26%)Ships in 1-2 Business DaysProduct Specifications- Other Name: Switch, Oil Pressure
- Replaces: PE01-18-501, PE01-18-501A
Mazda Sensor, Oil Pressure Part Number: PX9R-18-541
$113.08 MSRP: $150.80You Save: $37.72 (26%)Ships in 1-2 Business DaysProduct Specifications- Other Name: SENSOR,OIL PRESSURE; Oil Pressure Sending Unit, Oil Pressure Sensor
- Replaces: SH01-18-541, PY8V-18-541B
Mazda Oil Pressure Sending Unit Part Number: B61P-18-501
$235.48 MSRP: $314.04You Save: $78.56 (26%)Ships in 1-2 Business DaysProduct Specifications- Other Name: Switch Oil
Mazda Oil Pressure Sending Unit Part Number: E5D3-18-501
$20.50 MSRP: $27.34You Save: $6.84 (26%)Ships in 1-2 Business DaysProduct Specifications- Other Name: Switch Oil
Mazda Oil Pressure Sending Unit Part Number: N3H1-18-501
$22.44 MSRP: $29.93You Save: $7.49 (26%)Ships in 1-2 Business DaysProduct Specifications- Other Name: Switch, Oil Pressure
Mazda Oil Pressure Sending Unit Part Number: 1F21-18-501C
$27.08 MSRP: $36.12You Save: $9.04 (26%)Ships in 1-2 Business DaysProduct Specifications- Other Name: Switch, Oil Pressure
- Replaces: 1F21-18-501B, 1F21-18-501A, L3N1-18-501A, L3N1-18-501B, 1F21-18-501
Mazda Oil Pressure Sending Unit Part Number: ZZM0-18-501
$38.11 MSRP: $50.83You Save: $12.72 (26%)Product Specifications- Other Name: Switch Oil
Mazda Oil Pressure Sending Unit Part Number: BU01-21-291A
$80.74 MSRP: $107.68You Save: $26.94 (26%)Ships in 1-2 Business DaysProduct Specifications- Other Name: Switch, Oil Pressure
Mazda Oil Pressure Sending Unit Part Number: FNE2-21-2J1A
$82.35 MSRP: $109.82You Save: $27.47 (26%)Ships in 1-2 Business DaysProduct Specifications- Other Name: Switch, Oil Pressure
- Replaces: FSS0-21-2J1A
Mazda Oil Pressure Sending Unit Part Number: N3R1-18-541
$113.81 MSRP: $151.78You Save: $37.97 (26%)Ships in 1-2 Business DaysProduct Specifications- Other Name: Sensor, Oil Pressure
Mazda Oil Pressure Sending Unit Part Number: ZZC0-18-501A
$119.11 MSRP: $158.84You Save: $39.73 (26%)Product Specifications- Other Name: Switch, Oil Black Connector; Oil Gauge Sending Unit
- Replaces: AJC1-18-501, GY01-18-501A, GY01-18-501, ZZC0-18-501, ZZTT-18-501
Mazda Oil Pressure Sending Unit Part Number: N201-10-730
$184.39 MSRP: $245.90You Save: $61.51 (26%)Ships in 1-2 Business DaysProduct Specifications- Other Name: Sensor, Oil Level
Mazda Oil Pressure Sending Unit Part Number: B366-18-501
$23.33 MSRP: $31.10You Save: $7.77 (25%)Ships in 1-2 Business DaysProduct Specifications- Other Name: Switch Oil
| Page 1 of 2 |Next >
1-20 of 22 Results
Mazda Oil Pressure Switch
Mazda Oil Pressure Switch ensures the safety of the engine by immediately notifying the driver if there is a movement of oil pressure out of the safe range. Mazda has made a name for itself with cars that are lively on winding roads, and that spirit is connected to smart technology such as efficient Skyactiv engines, Kodo styling that looks ready to pounce and i-Activsense features that keep occupants confident in any traffic. The brand was started in 1931 and became famous in the 1960s with the rotary engine and now is exploring electric drive and mild hybrids and testing i-Activ AWD on harsh terrain proving Mazda is focused on innovation that increases the fun without wasting fuel. Just like the chassis strives for balance, the universal Oil Pressure Switch helps to give balance inside every engine using a small diaphragm and contacts to open or close an electrical circuit based on the actual oil flow. When pressure falls too low or rises too high, the Oil Pressure Switch trips the dashboard light so the driver can take action before metal surfaces grind, a simple but important defense that is run every second with no software or other power requirements. Its sturdy design lends itself to every model in the Mazda range, with fast feedback, a long service life and low cost. The Mazda range now makes its ownership more worry free without losing the fun aspect that it promises.
You'll get great performance and real durability when you pick genuine OEM Oil Pressure Switch. Mazda builds these using high-quality materials and official factory methods to ensure they hold up mile after mile. You deserve that Mazda reliability without the headache of cheap knockoffs. It is easy to find exactly what you need in our huge inventory of genuine parts. Plus, every OEM part carries a real manufacturer's warranty for your peace of mind. You will love our low prices too. Order today and we will ship your brand-new parts fast. They often reach your door in just a few days.
Mazda Oil Pressure Switch Parts and Q&A
- Q: What are the differences between oil pressure senders and oil pressure switches, and how are they tested and installed on Mazda B2200?A:Oil pressure senders are utilized for oil pressure gauges, while oil pressure switches are designated for vehicles equipped solely with a low oil pressure warning lamp. The locations of these components vary by engine type: for the 2.2L engine, they are found on the left side rear of the engine in the cylinder head; for the 2.6L engine, on the right-hand side of the engine block above the oil filler; for the 3.0L engine (MPV), on the left-hand lower side of the engine at the oil filter adapter; and for the 4.0L engine, on the left side front of the engine below the cylinder head in the engine block. To test the oil pressure switch, open the hood and locate the switch, then disconnect the wire and attach one end of a jumper wire to the terminal on the end of the wire, touching the other end to a good engine ground while an assistant observes the instrument gauge cluster for the illumination of the low oil warning lamp. If the lamp does not illuminate, try a different grounding area; if it still does not illuminate, touch the jumper wire to the negative battery post to determine if the engine is properly grounded. If the lamp illuminates, the grounding is the issue; if not, connect the original wire to the oil pressure switch, turn the ignition switch to the ON position without starting the engine, and check the other lights on the instrument cluster to assess the condition of the oil pressure switch and power supply. For removal and installation, first disconnect the negative battery cable, then disconnect the wiring at the sender/switch and remove the oil pressure sender/switch from the engine. For installation, coat the threads with electrically conductive sealer, thread the unit into place, tighten it to 10-13 ft. lbs (13-17Nm), reattach the wiring, and connect the negative battery cable.
- Q: How to test the oil pressure switch and How to remove and install on Mazda Millenia?A:To verify the oil pressure switch, connect an ohmmeter between the oil pressure switch and ground to determine continuity with the engine off and on. Start by removing the single wire harness connector of the switch. Switch on the ignition switch; the lamp indicating the presence of oil pressure must be off, and it is not, then look at the wire harness and see whether it has shorted to ground. Attach the ohmmeter to the pressure switch and ground, when the engine is off the ohmmeter must show continuity, and when the engine is running, must show no continuity. In case the readings are not indicated as planned, carry out an engine oil pressure check, and in case the oil pressure is normal, change the switch. Removal and installation To be removed and installed, place oil pressure switch or filter close to the oil filter. Disassemble the connector with the wire harness by unscrewing it counterclockwise, and wipe off the switch by wiping the connector. Installation This is a 3 thread installation where the thread three up, and the head of the switch sealed with sealant of the third thread then tightened to 8.7-13 ft. lbs. (12-17Nm).

Related Mazda Parts
 Mazda Oxygen Sensor
 Mazda Camshaft Position Sensor
 Mazda Distributor
 Mazda Distributor Cap
 Mazda Ignition Coil
 Mazda Speed Sensor
 Mazda Throttle Position Sensor
 Mazda Distributor Rotor
 Mazda Fuel Pump Wiring Harness
 Mazda Fuel Sending Unit
 Mazda Ignition Control Module
 Mazda Temperature Sender
Browse by Model
2 Oil Pressure Switch 3 Oil Pressure Switch 323 Oil Pressure Switch 5 Oil Pressure Switch 6 Oil Pressure Switch 626 Oil Pressure Switch 929 Oil Pressure Switch B2000 Oil Pressure Switch B2200 Oil Pressure Switch B2300 Oil Pressure Switch B2500 Oil Pressure Switch B2600 Oil Pressure Switch B3000 Oil Pressure Switch B4000 Oil Pressure Switch CX-3 Oil Pressure Switch CX-30 Oil Pressure Switch CX-5 Oil Pressure Switch CX-50 Oil Pressure Switch CX-7 Oil Pressure Switch CX-9 Oil Pressure Switch Miata Oil Pressure Switch Millenia Oil Pressure Switch MPV Oil Pressure Switch MX-3 Oil Pressure Switch MX-5 Miata Oil Pressure Switch MX-6 Oil Pressure Switch Navajo Oil Pressure Switch Protege Oil Pressure Switch Protege5 Oil Pressure Switch RX-7 Oil Pressure Switch RX-8 Oil Pressure Switch Tribute Oil Pressure Switch