×
- Hello
- Login or Register
- Quick Links
- Live Chat
- Track Order
- Parts Availability
- RMA
- Help Center
- Contact Us
- Shop for
- Mazda Parts
My Garage
My Account
Cart
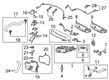
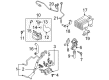
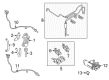
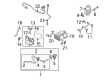
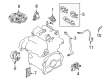
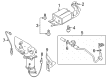
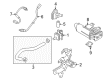
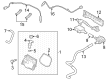
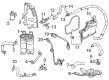
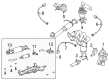
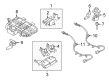
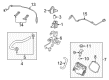
Genuine Mazda Oxygen Sensor
Oxygen O2 Sensor- Select Vehicle by Model
- Select Vehicle by VIN
Select Vehicle by Model
orMake
Model
Year
Select Vehicle by VIN
For the most accurate results, select vehicle by your VIN (Vehicle Identification Number).
205 Oxygen Sensors found


Mazda Oxygen Sensor Part Number: PYFA-18-8G1A
$319.65 MSRP: $426.29You Save: $106.64 (26%)Ships in 1-2 Business DaysProduct Specifications- Other Name: Sensor, Air&Fuel Ratio; Front Oxygen Sensor, Upper Oxygen Sensor
- Replaces: PYFA-18-8G1


Mazda Oxygen Sensor Part Number: L556-18-861A
$220.78 MSRP: $294.42You Save: $73.64 (26%)Ships in 1-2 Business DaysProduct Specifications- Other Name: Sensor, Oxygen; Rear Oxygen Sensor
- Replaces: L556-18-861


Mazda Oxygen Sensor Part Number: LF3T-18-8G1
$198.96 MSRP: $265.33You Save: $66.37 (26%)Ships in 1-2 Business DaysProduct Specifications- Other Name: Sensor, Air & Fuel Ratio; Upper Oxygen Sensor


Mazda Oxygen Sensor Part Number: L33L-18-8G1E-9U
$215.05 MSRP: $286.80You Save: $71.75 (26%)Ships in 1-2 Business DaysProduct Specifications- Other Name: Sensor, Air & Fuel Ration; Front Oxygen Sensor


Mazda Oxygen Sensor Part Number: KJ02-18-861C-9U
$168.83 MSRP: $225.15You Save: $56.32 (26%)Ships in 1-2 Business DaysProduct Specifications- Other Name: Sensor, Oxygen

Mazda Oxygen Sensor Part Number: CA41-18-861
$113.41 MSRP: $151.25You Save: $37.84 (26%)Ships in 1-2 Business DaysProduct Specifications- Other Name: Sensor, Oxygen
- Replaces: CA39-18-861


Mazda Oxygen Sensor Part Number: AJF5-18-861A
$49.44 MSRP: $65.93You Save: $16.49 (26%)Ships in 1-2 Business DaysProduct Specifications- Other Name: Sensor, Oxygen; Front Oxygen Sensor
- Replaces: AJF5-18-861


Mazda Oxygen Sensor Part Number: P51S-18-86ZA
$159.78 MSRP: $213.08You Save: $53.30 (26%)Ships in 1-2 Business DaysProduct Specifications- Other Name: Sensor, Oxygen; Lower Oxygen Sensor

Mazda Oxygen Sensor Part Number: PE07-18-8G1
$185.34 MSRP: $247.17You Save: $61.83 (26%)Ships in 1-2 Business DaysProduct Specifications- Other Name: Sensor, Air & Fuel Ratio; Upper Oxygen Sensor

Mazda Oxygen Sensor Part Number: PYFB-18-86Z
$212.58 MSRP: $283.49You Save: $70.91 (26%)Ships in 1-2 Business DaysProduct Specifications- Other Name: Sensor, Oxygen; Lower Oxygen Sensor

Mazda Oxygen Sensor Part Number: PE08-18-86ZA
$171.55 MSRP: $228.78You Save: $57.23 (26%)Ships in 1-2 Business DaysProduct Specifications- Other Name: Sensor, Oxygen; Lower Oxygen Sensor
Mazda Oxygen Sensor Part Number: LFJD-18-8G1A
$201.01 MSRP: $268.07You Save: $67.06 (26%)Ships in 1-2 Business DaysProduct Specifications- Other Name: Sensor, Air & Fuel Ratio; Upper Oxygen Sensor

Mazda Sensor, Air&Fuel Ratio Part Number: PXEN-18-8G1
$208.16 MSRP: $277.60You Save: $69.44 (26%)Ships in 1-2 Business DaysProduct Specifications- Other Name: SENSOR,AIR&FUEL RATIO; Oxygen Sensor, Upper Oxygen Sensor

Mazda Oxygen Sensor Part Number: L555-18-8G1B
$268.10 MSRP: $357.54You Save: $89.44 (26%)Ships in 1-2 Business DaysProduct Specifications- Other Name: Sensor, Air & Fuel Ratio; Front Oxygen Sensor
- Replaces: L555-18-8G1, L555-18-8G1A

Mazda Oxygen Sensor Part Number: ZZC4-18-861
$44.91 MSRP: $59.89You Save: $14.98 (26%)Product Specifications- Other Name: Sensor; Lower Oxygen Sensor
- Replaces: L3H6-18-861A, L3TT-18-861, L3H6-18-861, ZZCC-18-860

Mazda Oxygen Sensor Part Number: L518-18-8G1A
$129.19 MSRP: $172.28You Save: $43.09 (26%)Ships in 1-2 Business DaysProduct Specifications- Other Name: Sensor, Air & Fuel Ration; Upper Oxygen Sensor
- Replaces: L518-18-8G1

Mazda Oxygen Sensor Part Number: PEDE-18-86Z
$132.25 MSRP: $176.36You Save: $44.11 (26%)Ships in 1-2 Business DaysProduct Specifications- Other Name: Sensor, Oxygen; Lower Oxygen Sensor
Mazda Oxygen Sensor Part Number: KJ04-18-861B-9U
$185.55 MSRP: $247.46You Save: $61.91 (26%)Ships in 1-2 Business DaysProduct Specifications- Other Name: Sensor, Oxygen
Mazda Oxygen Sensor Part Number: KJ01-18-861A-9U
$192.03 MSRP: $256.08You Save: $64.05 (26%)Ships in 1-2 Business DaysProduct Specifications- Other Name: Sensor, Oxygen
- Replaces: KJ01-18-861A
Mazda Oxygen Sensor Part Number: KJ03-18-861B-9U
$208.18 MSRP: $277.62You Save: $69.44 (26%)Ships in 1-2 Business DaysProduct Specifications- Other Name: Sensor, Oxygen
- Replaces: KJ03-18-861A, KJ03-18-861A-9U
| Page 1 of 11 |Next >
1-20 of 205 Results
Mazda Oxygen Sensor
Mazda Oxygen Sensor is applied to continuously measure the oxygen level in the exhaust so that the engine computer can fine-tune the fuel delivery, reducing emissions and keeping the catalytic converter in good condition. Mazda has received global respect since its first car in 1931, which combined daring rotary engines with today's Skyactiv powertrains that sip fuel without dulling driving fun. The company employs Kodo design to make all curves have a sense of movement, and its i-Activsense suite adds lane keeping and radar cruise that add confidence on long trips. Mazda also experiments with electric drive, mild hybrids, and rugged i-Activ AWD to allow owners to enjoy smooth city driving and spirited mountain runs with the same ease. It is these characteristics that convey how Mazda balances efficiency, safety, and excitement for those who desire more than mere transportation. While those brand qualities establish the playing field, the Oxygen Sensor utilized throughout the lineup plays a quiet, yet vital role in maintaining them. Mounted in the exhaust stream, the Oxygen Sensor samples the leftover oxygen, compares it with outside air, then transmits a fast voltage signal that stimulates the immediate correction of fuel for clean combustion. Integrated heaters reach ideal temperature in seconds, reducing cold-start pollutants and protecting precious catalysts. Whether it's the element using zirconia for swift switching or advanced wideband feedback, the sensor provides Mazda engines with support, maximizing their mileage, maintaining their power, and ensuring that every vehicle complies with strict environmental rules without sacrificing the zoom-zoom spirit.
You'll get great performance and real durability when you pick genuine OEM Oxygen Sensor. Mazda builds these using high-quality materials and official factory methods to ensure they hold up mile after mile. You deserve that Mazda reliability without the headache of cheap knockoffs. It is easy to find exactly what you need in our huge inventory of genuine parts. Plus, every OEM part carries a real manufacturer's warranty for your peace of mind. You will love our low prices too. Order today and we will ship your brand-new parts fast. They often reach your door in just a few days.
Mazda Oxygen Sensor Parts and Q&A
- Q: How should one service an oxygen sensor to avoid damage and ensure proper installation on Mazda 3?A:Handling an oxygen sensor: When cleaning an oxygen sensor, beware that it is fitted in exhaust manifold or pipe that may shrink during cooling process and hence it is hard to loosen when the engine is cold. To prevent damaging sensor or its mounting threads it is better to turn the engine on a minute or two then turn it off without burning yourself. The pigtail and electrical connector on oxygen sensors cannot be removed, and the destruction of any of them will cause the sensor to become useless. Avoid exposing the electrical connector and the louvered tip of the sensor to grease, dirt, or any other type of contaminant and should never apply any cleaning solvents to it. Be careful with the sensor to prevent drops or a rough treatment of the sensor, and make sure that the silicone boot is properly attached, and it does not melt and cause any operational problems. De-connect the cable with the negative battery post, raise the front of the vehicle, and hold it up with jackstands in place, and then remove the engine under-cover. On the upstream oxygen sensor, it is in the top of the catalytic converter assembly/integral exhaust manifold where you unscrew the sensor using a wrench or socket, dislinked the electrical connector, and disassembled any harness clips. When reinstalling the old sensor, place anti-seize compound on the threads, or in the case of a new sensor, there is some anti-seize compound on the new sensor. Installation is done in reverse order and this means that sensor is secured by tightening. In the case of downstream oxygen sensors, California emission models include two, non-California ones include one, which is in the lower end of the exhaust manifold/catalytic converter assembly or on the short part of the exhaust pipe after the catalyst. Identify the downstream sensor, unscrew the sensor, and unscrew the electrical connector, and unscrew any harness clips. Once more, use anti-seize compound in the event of re-installing the old sensor and tighten the sensor during installation.
- Q: What should be noted when servicing an oxygen sensor on Mazda 6?A:When servicing an oxygen sensor, it is worth pointing out that such sensors are fitted at the exhaust manifold or pipe which at times is hard to loosen as it contracts when the engine is cold. To prevent scalding the sensor or the threading, it is advisable to wait a minute or two and first start the engine and then run the engine to avoid damaging the sensor or its screwing threads beforehand. Oxygen sensors are permanently fitted with a pigtail and electric connection that must not be broken or taken off because they will not help to use the sensor. Do not get grease, dirt, and other contaminants on the electrical connector or the louvered end of the sensor, and avoid using any cleaning solvents on it. Be gentle with the sensor to avoid dropping and rough handling of the sensor and make sure the silicone boot fits in place to prevent melting and complications in its operation. In case of replacement, both the upstream and downstream sensors are applicable and the former is located at the upper end of the exhaust manifold/catalytic converter assembly and the latter at the lower end or right below the catalyst. Start by unplugging the cable on the negative battery, and then lift the front part of the car and place on jackstands in order to work on the sensors. Lift off the engine cover, follow the electrical lead of the oxygen sensor to the connector, and disconnect the oxygen sensor. Unscrew the sensor using a wrench or oxygen socket. When re-fitting an old sensor, lubricate the threads of the sensor using antiseize compound; when used with a new sensor, then this is not necessary as it is already covered. Lastly, the process of installation is the opposite of the removal, which means securing the oxygen sensor to the required amount of torque.


Related Mazda Parts
 Mazda Transmission Control Module
 Mazda Brake Light Switch
 Mazda Distributor Cap
 Mazda Ignition Coil
 Mazda Knock Sensor
 Mazda MAP Sensor
 Mazda Vehicle Speed Sensor
 Mazda Fuse
 Mazda Distributor Rotor
 Mazda Fuel Pump Wiring Harness
 Mazda Fuel Sending Unit
 Mazda Temperature Sender
Browse by Model
2 Oxygen Sensor 3 Oxygen Sensor 323 Oxygen Sensor 5 Oxygen Sensor 6 Oxygen Sensor 626 Oxygen Sensor 929 Oxygen Sensor B2200 Oxygen Sensor B2300 Oxygen Sensor B2500 Oxygen Sensor B2600 Oxygen Sensor B3000 Oxygen Sensor B4000 Oxygen Sensor CX-3 Oxygen Sensor CX-30 Oxygen Sensor CX-5 Oxygen Sensor CX-50 Oxygen Sensor CX-7 Oxygen Sensor CX-70 Oxygen Sensor CX-9 Oxygen Sensor CX-90 Oxygen Sensor Miata Oxygen Sensor Millenia Oxygen Sensor MPV Oxygen Sensor MX-3 Oxygen Sensor MX-5 Miata Oxygen Sensor MX-6 Oxygen Sensor Protege Oxygen Sensor Protege5 Oxygen Sensor RX-7 Oxygen Sensor RX-8 Oxygen Sensor Tribute Oxygen Sensor