×
- Hello
- Login or Register
- Quick Links
- Live Chat
- Track Order
- Parts Availability
- RMA
- Help Center
- Contact Us
- Shop for
- Mazda Parts
My Garage
My Account
Cart
Genuine Mazda B2000 Camshaft
Cam- Select Vehicle by Model
- Select Vehicle by VIN
Select Vehicle by Model
orMake
Model
Year
Select Vehicle by VIN
For the most accurate results, select vehicle by your VIN (Vehicle Identification Number).
1 Camshaft found

Mazda B2000 Camshaft Part Number: FE85-12-420B
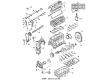
Mazda B2000 Camshaft
The Mazda B2000 Camshaft opens and closes the valves of the engine at predetermined moments during which the engine inhales the air-fuel mixture and expels exhaust. The Camshaft is made of cast iron or hardened steel, with egg-shaped lobes on its surface, the tops protruding to contact lifters, pushrods, followers, or buckets and open the valves, while springs close the valves. In a four-stroke engine the crankshaft is connected via a belt or chain to one end of the Camshaft at half speed, ensuring that the movement of the piston and the valves is perfectly synchronized. In pickup production Mazda employed two layouts, namely block-mounted overhead valve design as well as overhead single overhead cam or double overhead cam units. Under the OHV design the Camshaft is mounted low, driven via lifters, pushrods, and rocker arms, but in the SOHC or DOHC design the shafts are mounted in the head such that the lobes work directly on the followers or buckets and reduce moving parts, thereby enabling higher revs. Various profiles, lift, and duration enable Mazda to adjust torque, idle quality, and top-end pull for daily driving. Regular oil changes prevent scuffing of the lobes, as scuffing leads to misfires, rough idling, and even destruction of valves or pistons. In the event of failure replacement is better than repair, and consumers have to identify length and lobe profile for the proper Mazda B2000.
Looking for Camshaft with proven quality? Choose OEM Camshaft. Mazda designs and builds them to strict factory specs. Every piece goes through rigorous quality checks. You'll get parts that fit right and work like new. Shop our huge inventory of OEM Mazda B2000 parts. Enjoy the highly competitive prices online. Our site is your one-stop shop. Each genuine B2000 part includes a manufacturer's warranty. Buy with confidence. Our return policy is simple and hassle-free. In a rush? Choose expedited delivery at checkout. You'll love the streamlined experience from search to checkout to receiving your order.
Mazda B2000 Camshaft Parts and Q&A
- Q: How to remove and install Camshaft and Camshaft Bearing components on Mazda B2000?A:Removal and installation To change components to suit different engine sizes, a cold engine should be used and alignment marks should be scribed on the hinges of the hood before removing the hood. Next, remove the Water Pump, disconnect coil wire and vacuum line to the distributor, and turn the crankshaft until the number one cylinder is in the TDC position in the compression stroke. Take out the plug wires, the distributor cap, and distributor, and the valve cover next. Take off the cylinder head bolts, Rocker Arm assembly and the distributor gear on the camshaft and release the tension on the Timing Chain. Clean all gasket surfaces and bolt holes and fit the camshaft and gear, checking valve timing. Once more assemble the rocker arm assembly, tighten head bolts and tension the timing chain. With bigger engines, disconnect the battery, empty the cooling system and take out all sorts of parts such as the distributor, fan shroud, alternator, and crankshaft pulley. This is done by following steps such as aligning timing marks, removing the Timing Belt and camshaft sprocket and installing the new camshaft, making sure that the timing marks are properly lubricated and aligned. In the case of diesel engines, looseness the hood, empty the coolant and oil, disconnect battery cables, take away parts of the Radiator, Exhaust Manifold, etc. and then lift the engine. Installation Reverse all processes of removal, and make sure that all connections are solid. To check camshaft settings, de-fit air cleaner and rocker arm covers, fit dial indicator and lobe lift checked with due regard to valve clearance. Check camshaft end play using dial indicator and adjust as the need arises, changing parts in case of excess wear.
Related Mazda B2000 Parts
 Mazda B2000 Cam Gear
 Mazda B2000 Crankshaft Gear
 Mazda B2000 Crankshaft Seal
 Mazda B2000 Crankshaft Timing Gear
 Mazda B2000 Cylinder Head Gasket
 Mazda B2000 Exhaust Valve
 Mazda B2000 Intake Valve
 Mazda B2000 Rocker Arm
 Mazda B2000 Timing Chain
 Mazda B2000 Timing Cover
 Mazda B2000 Valve Guide
 Mazda B2000 Valve Spring Retainer Keeper