×
- Hello
- Login or Register
- Quick Links
- Live Chat
- Track Order
- Parts Availability
- RMA
- Help Center
- Contact Us
- Shop for
- Mazda Parts
My Garage
My Account
Cart
Genuine Mazda MPV Cylinder Head
Head- Select Vehicle by Model
- Select Vehicle by VIN
Select Vehicle by Model
orMake
Model
Year
Select Vehicle by VIN
For the most accurate results, select vehicle by your VIN (Vehicle Identification Number).
3 Cylinder Heads found


Mazda MPV Cylinder Head Part Number: ZZC2-10-100R-00
Mazda MPV Cylinder Head Part Number: JE06-10-100F
Mazda MPV Cylinder Head Part Number: G601-10-100C
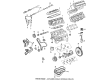
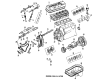
Mazda MPV Cylinder Head
Looking for Cylinder Head with proven quality? Choose OEM Cylinder Head. Mazda designs and builds them to strict factory specs. Every piece goes through rigorous quality checks. You'll get parts that fit right and work like new. Shop our huge inventory of OEM Mazda MPV parts. Enjoy the highly competitive prices online. Our site is your one-stop shop. Each genuine MPV part includes a manufacturer's warranty. Buy with confidence. Our return policy is simple and hassle-free. In a rush? Choose expedited delivery at checkout. You'll love the streamlined experience from search to checkout to receiving your order.
Mazda MPV Cylinder Head Parts and Q&A
- Q: What steps should be taken for thorough cleaning and inspection of the cylinder head and valve train components during an engine overhaul on Mazda MPV?A:A careful cleaning of the cylinder head(s) as well as the associated valve train parts and a careful inspection will allow deciding on whether a specific amount of work on valve services was needed during the engine overhaul. Start by removing all the old gasket material and sealant in the mating surfaces of the head gasket, intake manifold and exhaust manifold being careful not to gouge the cylinder head. Clean away old deposits of scale in the passages of the coolant, and with a stiff wire brush wipe the deposits off the edges of the holes. Install a suitable size tap in each threaded hole to remove corrosion and thread sealant and remove debris by blowing on it using compressed air. Clean threads of the camshaft bearing cap bolt with wire brush, clean the cylinder head with solvent and dry thoroughly polishing it with compressed air to speed the drying process. Decarbonizing of chemicals could help in cleaning up the heads of the cylinder and the parts of the valve train but it should be used sparingly. Wipe off the solvent on the bearer caps and the rocker arms of the engine, taking care not to confuse them, and dry thoroughly. Wipe individual valve springs, spring seats, keepers and retainers to prevent confusion of parts. Eliminate the heavy deposits of the valves with the help of a motorized wire brush, keeping the valves in order. Check the head, its cracks, coolant, etc., and repair them in an automotive machine shop, in case of any damage. Inspect the head gasket mating surface with a straightedge and feeler gauge; a warped mating surface can be surpassed of the limit and might need to be resurfaced. Inspect the valve seats, pitting, cracks, or burning indicates that the valves should be serviced by a home mechanic. Measure the clearance between the valve stem and the guide using a dial indicator and in case there is any concern regarding the valve guides, the machine shop should examine them. Check all valve face wear, deformation, cracks, pits, and burned areas, inspect the valve stem scuffing and galling. Check the margin width of all the valves, substituting those with less than required margins. Inspect all valve springs and pits and check the free length and be sure that they are specifications; no sagged springs should be used. Lay each spring on its flat surface to examine its squareness, and change any distorted or sagged springs. Check spring retainers and keepers regarding their wear and cracks and replace any doubtful ones before the engine can cause a lot of damage. In case the inspection reveals that the elements of the valves are not in excellent condition and have become worn out beyond the limits, re-assemble the valves in the cylinder head.
- Q: How to remove and reinstall a cylinder head on Mazda MPV?A:This is a procedure not to be done until the engine is fully cooled. The number 1 cylinder has the engine positioned at TDC on the compression stroke. Empty engine coolant and remove the cable on the negative terminal of battery. Take off the Timing Belt cover and belt then the intake manifold. Disassemble the exhaust manifold(s), being careful to retain the exhaust manifold(s) attached to the cylinder head until the head has been removed in the engine, but disconnected to the exhaust system. Take out the seal plates on the front and back of the cylinder heads and the cover of the valves. When removing the left cylinder head, disassemble the distributor, when removing the right cylinder, remove the transmission fluid dipstick tube unless the car has an automatic transmission. Mark and remove any hose, wire, and bracket that can be a nuisance to removing the head. Tighten the cylinder head bolts, in reverse order to the sequence of tightening them, in 1/4 turn increments until they could be loosened by hand. Lift the block the head out of, with a piece of wood and a hammer in case of any resistance, and take care not to break either the block or the head. Place the head between two wood blocks so as not to damage the gasket matching surface or the valves. Eliminate every remnant of the old gasket material on the mating surfaces of the cylinder head and engine block, clean with lacquer thinner or acetone. Inspect the block and head mating surfaces, nicks, deep scratches and other damage, file slight damage or machine extreme. Apply a tap of proper size and follow the threads in the head bolt holes and then run a die down the threads of each bolt to eliminate corrosion and recycle the threads. Make sure that the threaded holes in the block are dry. Place the new gaskets on the dowel pins of the block with the Right or Left mark of the head gasket(s) upward. It is important to ensure those heads lie on the block without distorting the gaskets and to ensure no O-ring on the projection of the oil control plug is marred. Measuring the length of cylinder head bolts and changing them in case they have lengthened past the preset limit. Grease the threads, and place the bolts in the original positions and tighten them with the fingers. Install bolts in a sequence as recommended and in three steps, tighten the bolts up to recommended torque. The other installation processes are opposite of the removal. Lastly, pour in some coolant and replace the engine oil and the filter then start the engine and ensure there are no oil and coolant leakages.


