×
- Hello
- Login or Register
- Quick Links
- Live Chat
- Track Order
- Parts Availability
- RMA
- Help Center
- Contact Us
- Shop for
- Mazda Parts
My Garage
My Account
Cart
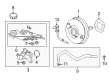
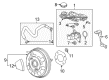
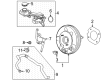
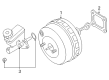
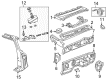
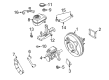
Genuine Mazda Brake Master Cylinder
- Select Vehicle by Model
- Select Vehicle by VIN
Select Vehicle by Model
orMake
Model
Year
Select Vehicle by VIN
For the most accurate results, select vehicle by your VIN (Vehicle Identification Number).
101 Brake Master Cylinders found


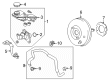
Mazda Master Cylinder Part Number: KDY3-43-40ZA
$388.90 MSRP: $522.82You Save: $133.92 (26%)Ships in 1-2 Business DaysProduct Specifications- Other Name: Cylinder, Tandem Master
- Replaces: KDY3-43-40Z


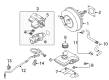
Mazda Master Cylinder Part Number: TKY8-43-40Z
$429.39 MSRP: $577.24You Save: $147.85 (26%)Ships in 1-2 Business DaysProduct Specifications- Other Name: Cylinder, Tandem Master


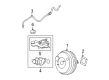
Mazda Master Cylinder Part Number: BDYV-43-40Z
$148.86 MSRP: $198.52You Save: $49.66 (26%)Ships in 1-2 Business DaysProduct Specifications- Other Name: Cylinder, Tandem Master


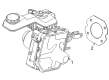
Mazda Master Cylinder Part Number: ZZC5-43-990
$173.55 MSRP: $231.44You Save: $57.89 (26%)Product Specifications- Other Name: Cylinder, Tandem Master


Mazda Master Cylinder Part Number: BDYS-43-40Z
$209.79 MSRP: $279.78You Save: $69.99 (26%)Ships in 1-2 Business DaysProduct Specifications- Other Name: Cylinder, Tandem Master

Mazda Master Cylinder Part Number: CGY5-43-40Z
$373.18 MSRP: $497.67You Save: $124.49 (26%)Ships in 1-2 Business DaysProduct Specifications- Other Name: Cylinder, Tandem Master

Mazda Master Cylinder Part Number: BPYS-43-40ZC
$324.16 MSRP: $432.30You Save: $108.14 (26%)Ships in 1-2 Business Days
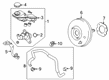
Mazda Unit, Hydraulic-Brake Part Number: KRYV-43-9A0B
$2340.88 MSRP: $3198.55You Save: $857.67 (27%)Ships in 1-2 Business DaysProduct Specifications- Other Name: UNIT,HYDRAULIC-BRAKE; ABS Control Unit, Brake Booster, Master Cylinder

Mazda Master Cylinder Part Number: DFY4-43-40Z
$295.94 MSRP: $394.66You Save: $98.72 (26%)Ships in 1-2 Business DaysProduct Specifications- Other Name: Cylinder, Tandem Master
Mazda Master Cylinder Part Number: DKY0-43-40Z
$304.80 MSRP: $406.48You Save: $101.68 (26%)Ships in 1-2 Business DaysProduct Specifications- Other Name: Cylinder, Tandem Master

Mazda Master Cylinder Part Number: KDY4-43-40ZA
$388.90 MSRP: $522.82You Save: $133.92 (26%)Ships in 1-2 Business DaysProduct Specifications- Other Name: Cylinder, Tandem Master
- Replaces: KDY4-43-40Z

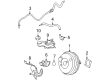
Mazda Unit, Hydraulic-Brake Part Number: DNYJ-43-9A0
$3040.14 MSRP: $4154.04You Save: $1113.90 (27%)Ships in 1-2 Business DaysProduct Specifications- Other Name: UNIT,HYDRAULIC-BRAKE; Brake Assembly, Master Cylinder
- Replaces: DNYJ-43-9A0A

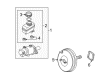
Mazda Master Cylinder Part Number: GSYL-43-40Z
$85.59 MSRP: $114.15You Save: $28.56 (26%)Ships in 1-2 Business DaysProduct Specifications- Other Name: Cylinder, Tandem Master

Mazda Master Cylinder Part Number: BJ0S-43-400R-00
$102.35 MSRP: $136.50You Save: $34.15 (26%)Ships in 1-2 Business DaysProduct Specifications- Other Name: Brake Master Cylinder

Mazda Master Cylinder Part Number: 1F60-43-990A
$209.20 MSRP: $278.99You Save: $69.79 (26%)Ships in 1-2 Business DaysProduct Specifications- Other Name: Cylinder, Tandem Master
- Replaces: 1F60-43-990

Mazda Master Cylinder Part Number: BCYA-43-40ZA
$240.51 MSRP: $320.74You Save: $80.23 (26%)Ships in 1-2 Business DaysProduct Specifications- Other Name: Cylinder, Tandem Master
- Replaces: BCYA-43-40Z

Mazda Master Cylinder Part Number: B3YF-43-40ZA
$251.49 MSRP: $335.39You Save: $83.90 (26%)Ships in 1-2 Business DaysProduct Specifications- Other Name: Cylinder, Tandem Master
- Replaces: B3YF-43-40Z, B37F-43-400
Mazda Master Cylinder Part Number: BDYF-43-40ZA
$251.94 MSRP: $335.99You Save: $84.05 (26%)Ships in 1-2 Business DaysProduct Specifications- Other Name: Cylinder, Tandem Master
- Replaces: BDYF-43-40Z

Mazda Master Cylinder Part Number: FE05-43-40ZC
$263.88 MSRP: $351.91You Save: $88.03 (26%)Ships in 1-2 Business DaysProduct Specifications- Other Name: Cylinder, Tandem Master
- Replaces: FE05-43-40ZB

Mazda Master Cylinder Part Number: EG23-43-40Z
$269.78 MSRP: $359.76You Save: $89.98 (26%)Ships in 1-2 Business Days
| Page 1 of 6 |Next >
1-20 of 101 Results
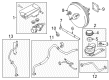
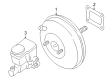
Mazda Brake Master Cylinder
The Mazda Brake Master Cylinder transforms a simple push on the brake pedal into balanced hydraulic force to provide even stopping power across the entire lineup. Mazda made its name by blending vibrant rotary engines with the updated in cutting-edge Skyactiv technology that wrings more mileage out of every drop of fuel, all wrapped in sculptured Kodo curves that make every driveway a stage. Through decades, Mazda has perfected safety hardware to match its powertrains, showing that innovation and reliability can travel the same road. Today, Mazda combines that style with intelligent i-Activsense aids, responsive all-wheel drive, and emerging electric options to give drivers excitement without compromising efficiency or safety. The brand puts the ideas out on difficult roads and then takes the lessons to the streets where people are driving everyday cars, proving that practical cars can also be fun. Matching this philosophy, the Brake Master Cylinder incorporates twin pistons, powerful springs, and sealed chambers to divide the hydraulic pressure into two circuits, whereby if one line is lost, the other still bites and keeps the car controllable. A light clip-on reservoir allows owners to see fluid at a glance, and the high firewall position aids in purging air quickly and providing a firm pedal feel. Because every Mazda has the same commitment to predictable handling, this Brake Master Cylinder design serves hatchbacks, sedans, and SUVs, providing the whole family of vehicles with the confident braking response that completes the Jinba-ittai connection between driver and machine.
You'll get great performance and real durability when you pick genuine OEM Brake Master Cylinder. Mazda builds these using high-quality materials and official factory methods to ensure they hold up mile after mile. You deserve that Mazda reliability without the headache of cheap knockoffs. It is easy to find exactly what you need in our huge inventory of genuine parts. Plus, every OEM part carries a real manufacturer's warranty for your peace of mind. You will love our low prices too. Order today and we will ship your brand-new parts fast. They often reach your door in just a few days.
Mazda Brake Master Cylinder Parts and Q&A
- Q: How to replace the Brake Master Cylinder on Mazda 3?A:The engine compartment has the master cylinder which is attached to the power brake booster. First empty as much water as you can out of the reservoir with a syringe or old turkey baster. Then remove the upper engine cover by lifting each side upwards and lifting it off the posts in the middle. This is done by removing the battery and PCM off the battery tray without disconnecting the electrical connectors of the PCM and then removing the battery tray. Lay the rags at the fluid fittings and have caps or plastic bags ready to cover the ends of the lines after being disconnected and be careful not to spill the brake fluid which would damage paint. Just in the case of manual transaxle models, push the locking tab downward to release the clutch master cylinder supply hose off the brake fluid reservoir and close the hose with a clamp. Relax the fittings at the ends of the brake lines as they enter into the master cylinder with a flare-nut wrench to avoid rounding-off the corners. Draw the ends of the brake lines a little away of the master cylinder and insert the ends to avoid contamination. Unscrew the electrical connector at the brake fluid level switch on the master cylinder reservoir, and unscrew the nuts which connect the master cylinder to the power booster and remove the master cylinder off the studs. When changing the master cylinder installing a new pin bolt to the reservoir and a reservoir as well is not required, simply take the reservoir pin bolt and reservoir of the old one and put it to the new one with making sure that new seals are installed. Fill the new master cylinder with oil before installation by holding the cylinder in a vise and connecting two bleeder tubes into the outlet ports. The brake fluid that is recommended should be used and pushed slowly into the master cylinder and push the pistons so that they can push air out of the master cylinder into the reservoir. Continue until all air bubbles are eliminated, then put the bleed tubes out of the system, one at a time, replace with a plug in the open ports so that the system does not leak or allow air to enter and plug the reservoir cap. The master cylinder is installed over the studs on the power brake booster and the attaching nuts are only finger tightened. Install a new O-ring into the sleeve at the master cylinder and thread the fittings of the brake lines into the master cylinder, moving the position a little to prevent thread stripping. Tighten the mounting nuts up to the recommended torque and install the fittings of the brake line. Wet the reservoir of the master cylinder with fluid, and bleed the master cylinder and the brakes by keeping an assistant on the brake pedal and to the floor, and by loosening the fitting, until all the air bubbles are out of the fluid. Have rags to wipe up any fluid brake fluid will destroy paint work and after bleeding wipe the area under the master cylinder with clean water. Lastly, make sure the vehicle is put back into normal service after having tested the system of braking.
- Q: How to remove and install the Brake Master Cylinder on Mazda 929?A:To remove and install the master cylinder, first, remove the air cleaner for clearance if necessary. Detach the fluid level sensor connector or the pressure switch connector located at the bottom of the master cylinder on RX-7s. Place a rag under the hydraulic lines and loosen their fittings at the master cylinder; for ABS-equipped models, loosen and disconnect the union fittings and washers, discarding the washers as they must be replaced. Position a container to collect any escaping brake fluid, then detach the hydraulic lines from the master cylinder. For older 626 models with a separate fluid reservoir, disconnect the lines between the two and plug them to prevent leakage. Unfasten the nuts securing the master cylinder to the power brake unit and withdraw the assembly from the unit, removing the old gasket if equipped. On 1988-89 626s and MX-6s with either a manual transaxle or ABS, and on all 929s, remove the clutch pipe mounting bracket from the power brake unit, taking care not to spill brake fluid on painted surfaces. For installation, on 1988-89 626s, MX-6s, and 929s, install the clutch pipe mounting bracket if equipped, and place a new gasket onto the brake power unit mounting studs. Position the master cylinder onto the mounting studs and tighten the nuts. Connect the hydraulic brake lines to the master cylinder, using new washers for ABS-equipped vehicles and torquing the fitting union bolts to 16-20 ft. lbs. (22-27 Nm). Finally, fasten the fluid level sensor or harness connectors, fill the reservoir with clean brake fluid, and bleed the system.


Related Mazda Parts
 Mazda Brake Controller
 Mazda Brake Caliper
 Mazda Vacuum Pump
 Mazda Wheel Hub
 Mazda ABS Pump And Motor Assembly
 Mazda ABS Reluctor Ring
 Mazda Axle Shaft Seal
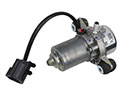 Mazda Brake Booster Vacuum Pump
 Mazda Brake Fluid Pump
 Mazda Brake Master Cylinder Repair Kit
 Mazda Hydraulic Hose
 Mazda Vacuum Check Valve
Browse by Model
2 Brake Master Cylinder 3 Brake Master Cylinder 323 Brake Master Cylinder 5 Brake Master Cylinder 6 Brake Master Cylinder 626 Brake Master Cylinder 929 Brake Master Cylinder B2000 Brake Master Cylinder B2200 Brake Master Cylinder B2300 Brake Master Cylinder B2500 Brake Master Cylinder B2600 Brake Master Cylinder B3000 Brake Master Cylinder B4000 Brake Master Cylinder CX-3 Brake Master Cylinder CX-30 Brake Master Cylinder CX-5 Brake Master Cylinder CX-50 Brake Master Cylinder CX-7 Brake Master Cylinder CX-70 Brake Master Cylinder CX-9 Brake Master Cylinder CX-90 Brake Master Cylinder Miata Brake Master Cylinder Millenia Brake Master Cylinder MPV Brake Master Cylinder MX-3 Brake Master Cylinder MX-30 EV Brake Master Cylinder MX-5 Miata Brake Master Cylinder MX-6 Brake Master Cylinder Navajo Brake Master Cylinder Protege Brake Master Cylinder Protege5 Brake Master Cylinder RX-7 Brake Master Cylinder RX-8 Brake Master Cylinder Tribute Brake Master Cylinder