×
- Hello
- Login or Register
- Quick Links
- Live Chat
- Track Order
- Parts Availability
- RMA
- Help Center
- Contact Us
- Shop for
- Mazda Parts
My Garage
My Account
Cart
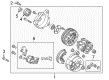
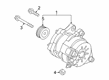
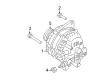
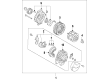
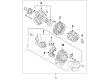
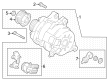
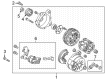
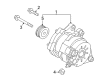
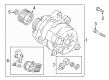
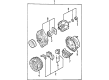
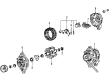
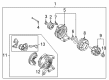
Genuine Mazda Alternator
Generator- Select Vehicle by Model
- Select Vehicle by VIN
Select Vehicle by Model
orMake
Model
Year
Select Vehicle by VIN
For the most accurate results, select vehicle by your VIN (Vehicle Identification Number).
73 Alternators found


Mazda Alternator Part Number: PE01-18-300R-00
$289.74 MSRP: $386.40You Save: $96.66 (26%)Ships in 1-2 Business DaysProduct Specifications- Other Name: Reman Alternator
- Replaced by: PE01-18-300


Mazda Alternator Part Number: PAF2-18-300A
$285.64 MSRP: $380.93You Save: $95.29 (26%)Ships in 1-2 Business DaysProduct Specifications- Replaces: PAF2-18-300


Mazda Alternator Part Number: ZJ38-18-300
$309.64 MSRP: $412.93You Save: $103.29 (26%)


Mazda Alternator Part Number: L3P9-18-300D
$468.76 MSRP: $630.18You Save: $161.42 (26%)Ships in 1-2 Business DaysProduct Specifications- Replaces: L3P9-18-300A, L3P9-18-300C, L3P9-18-300B


Mazda Alternator Part Number: L548-18-300B
$542.21 MSRP: $728.93You Save: $186.72 (26%)Ships in 1-2 Business DaysProduct Specifications- Replaces: L548-18-300R-0B


Mazda Alternator Part Number: L33G-18-300A
$731.56 MSRP: $999.61You Save: $268.05 (27%)Ships in 1-2 Business DaysProduct Specifications- Replaces: L33G-18-300, L33G-18-300R-00

Mazda Alternator Part Number: PA5J-18-300
$251.86 MSRP: $335.89You Save: $84.03 (26%)Ships in 1-2 Business Days
Mazda Alternator Part Number: PGH4-18-300
$306.85 MSRP: $409.22You Save: $102.37 (26%)Ships in 1-2 Business DaysProduct Specifications- Replaces: PGH2-18-300

Mazda Alternator Part Number: CY01-18-300A
$289.74 MSRP: $386.40You Save: $96.66 (26%)Ships in 1-2 Business DaysProduct Specifications- Replaces: CY01-18-300R-0B, CY01-18-300R-0A, CY01-18-300

Mazda Alternator Part Number: PY1C-18-300
$593.79 MSRP: $798.26You Save: $204.47 (26%)Ships in 1-2 Business Days
Mazda Alternator Part Number: P31H-18-300R-00
$289.74 MSRP: $386.40You Save: $96.66 (26%)Ships in 1-2 Business DaysProduct Specifications- Other Name: Reman Alternator
- Replaced by: P31H-18-300B

Mazda Alternator Part Number: PX8E-18-300
$283.89 MSRP: $378.59You Save: $94.70 (26%)Ships in 1-2 Business Days
Mazda Alternator Part Number: LF1F-18-300R-0A
$289.74 MSRP: $386.40You Save: $96.66 (26%)Ships in 1-2 Business DaysProduct Specifications- Other Name: Reman Alternator
- Replaced by: LF1F-18-300
Mazda Alternator Part Number: P53N-18-300C
$340.90 MSRP: $454.62You Save: $113.72 (26%)Ships in 1-2 Business DaysProduct Specifications- Replaces: P53N-18-300, P53N-18-300A, P53N-18-300B

Mazda Alternator Part Number: B61P-18-300F
$467.16 MSRP: $628.02You Save: $160.86 (26%)Ships in 1-2 Business Days
Mazda Alternator Part Number: LFB6-18-300R-00
$202.96 MSRP: $266.40You Save: $63.44 (24%)Ships in 1-2 Business Days
Mazda Alternator Part Number: PY8V-18-300C
$655.74 MSRP: $895.99You Save: $240.25 (27%)Ships in 1-2 Business DaysProduct Specifications- Replaced by: PY8V-18-300E
- Replaces: PY8V-18-300D
Mazda Alternator Part Number: PX4N-18-300
$271.94 MSRP: $362.66You Save: $90.72 (26%)Ships in 1-2 Business DaysMazda Alternator Part Number: PEDD-18-300R-00
$289.74 MSRP: $386.40You Save: $96.66 (26%)Ships in 1-2 Business DaysProduct Specifications- Other Name: Reman Alternator
- Replaced by: PEDD-18-300
Mazda Alternator Part Number: P51X-18-300R-00
$289.74 MSRP: $386.40You Save: $96.66 (26%)Ships in 1-2 Business DaysProduct Specifications- Other Name: Reman Alternator
- Replaced by: P51X-18-300B
| Page 1 of 4 |Next >
1-20 of 73 Results
Mazda Alternator
Mazda Alternator helps keep the battery charged and powers every single light and gadget while the engine is running, making it a quiet hero of every trip. Mazda started producing vehicles in 1931 and has since made a name for itself with sporty handling, reliable engineering and daring Kodo styling that lends every car a sense of motion even when it's parked. The brand made headlines with its rotary engine ingenuity, then won fans over again with fuel-saving Skyactiv technology that squeezes more distance out of every drop of gas. Today Mazda combines responsive steering with i-Activsense driver's aids, all-wheel drive that is ready for rough weather, and new electric options that demonstrate a forward thinking spirit. All these characteristics combine to provide a fun yet responsible driving experience to appeal to individuals who love the road. The Mazda Alternator itself is sized in accordance with that energetic character. Spinning around by way of a belt attached to the crankshaft, the Alternator forces alternating current through copper windings, which is then flipped to smooth direct current by a built-in diode bridge that feeds the battery and sensitive electronics. Internal voltage control reacts instantly to changes in stereo volume or headlight usage so cabin tech never flickers. Strong bearings and an aluminum case help it stay cool and durable through the entire Mazda lineup, giving drivers confidence that the charge they need is always on tap.
You'll get great performance and real durability when you pick genuine OEM Alternator. Mazda builds these using high-quality materials and official factory methods to ensure they hold up mile after mile. You deserve that Mazda reliability without the headache of cheap knockoffs. It is easy to find exactly what you need in our huge inventory of genuine parts. Plus, every OEM part carries a real manufacturer's warranty for your peace of mind. You will love our low prices too. Order today and we will ship your brand-new parts fast. They often reach your door in just a few days.
Mazda Alternator Parts and Q&A
- Q: What precautions must be taken to prevent damage to the alternator and regulator when working with the electrical system on Mazda B2200?A:Some precautions should be employed in assembling electrical system to avoid destruction of alternator and regulator. In case the battery is changed, then it is important to reconnect it with the proper polarity, as the reversal of the connections can easily damage the one-way rectifiers. In booster battery starting, the positive ends of the battery are connected and the negative end of the battery to a good engine ground on the vehicle being started. One should never charge a fast charger as a booster, and battery cables should not be plugged when charging with a fast charger. The alternator is not recommendable to be polarized and test lights must not exceed 12 V to test diode continuity. Do not short-across or ground alternator terminals. Electrical connections should be made with matching polarity of battery, alternator and regulator and alternator must never be disconnected on open circuit. Always keep all connections clean and tight, never leave battery ground terminal connected during servicing of electrical components and never leave battery connected to vehicle when arc welding is to be done.
- Q: How to replace an alternator on Mazda Protege?A:In dismantling the alternator, remove the alternator and place it on a clean work bench. The next step is to remove the nut, lock-washer, pulley and the four small bolts situated behind the pulley. Next, take four big bolts which fasten the front cover to the rear housing and loosen them. Then remove the stator, the two bolts that attach the brush holding assembly, and the nut behind the rear housing that has the retainer. In case of replacing the brushes, the length of each brush available is measured and compared with the required minimum length; in case one of the brushes is shorter than the required minimum, change them. Make sure that every brush slides in the brush holder. In case of component check, check the continuity of the two slip rings, where resistance should be 3.5 to 4.5 ohms. Probe between slip rings and the rotor, and ensure that continuity is not present. Should one of the rotor tests fail or should the slip rings be worn out too much, it is flawed. Check also continuity between one end of one stator windings and the same end of the other, when open, stator is faulty. Also, inspect a grounded stator winding between each stator terminal and the frame. Test the rectifier with an ohmmeter to ensure continuity and change it in case it fails any tests. To put back together, assemble the parts in the same order they were removed, but be sure to press down each brush using a small screwdriver, this way the brush holder can be fitted.


Related Mazda Parts
 Mazda Starter
 Mazda Starter Solenoid
 Mazda Alternator Bearing
 Mazda Alternator Bracket
 Mazda Alternator Brush
 Mazda Alternator Pulley
 Mazda Armature
 Mazda Battery Cable
 Mazda Battery Hold Downs
 Mazda Ground Cables
 Mazda Starter Drive Gear
 Mazda Voltage Regulator
Browse by Model
2 Alternator 3 Alternator 5 Alternator 6 Alternator 626 Alternator 929 Alternator B2200 Alternator B2300 Alternator B2500 Alternator B3000 Alternator B4000 Alternator CX-3 Alternator CX-30 Alternator CX-5 Alternator CX-50 Alternator CX-7 Alternator CX-9 Alternator Miata Alternator Millenia Alternator MPV Alternator MX-3 Alternator MX-5 Miata Alternator MX-6 Alternator Navajo Alternator Protege Alternator Protege5 Alternator RX-7 Alternator RX-8 Alternator Tribute Alternator