×
- Hello
- Login or Register
- Quick Links
- Live Chat
- Track Order
- Parts Availability
- RMA
- Help Center
- Contact Us
- Shop for
- Mazda Parts
My Garage
My Account
Cart
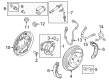
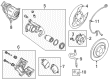
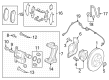
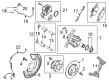
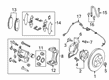
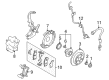
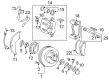
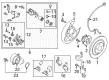
Genuine Mazda Brake Hose
Brake Line- Select Vehicle by Model
- Select Vehicle by VIN
Select Vehicle by Model
orMake
Model
Year
Select Vehicle by VIN
For the most accurate results, select vehicle by your VIN (Vehicle Identification Number).
157 Brake Hoses found

Mazda Brake Tube Part Number: DF71-43-650A
$7.09 MSRP: $9.45You Save: $2.36 (25%)Ships in 1-2 Business DaysProduct Specifications- Other Name: Pipe(Right), Brake-Rear
- Position: Passenger Side

Mazda Brake Hose Part Number: BADE-43-810
$12.40 MSRP: $16.54You Save: $4.14 (26%)Ships in 1-2 Business DaysProduct Specifications- Other Name: Hose, Flexible

Mazda Brake Hose Part Number: VA40-43-980
$15.45 MSRP: $20.60You Save: $5.15 (25%)Ships in 1-2 Business DaysProduct Specifications- Other Name: Hose(Right), Flexible-Front; Flex Hose
- Position: Passenger Side
- Replaced by: VA40-43-980A
Mazda Brake Hose Part Number: VA40-43-990
$15.45 MSRP: $20.60You Save: $5.15 (25%)Ships in 1-2 Business DaysProduct Specifications- Other Name: Hose(Left), Flexible-Front; Flex Hose
- Position: Driver Side
- Replaced by: VA40-43-990A

Mazda Flex Hose Part Number: DGH9-43-820
$30.49 MSRP: $40.66You Save: $10.17 (26%)Ships in 1-2 Business DaysProduct Specifications- Other Name: Hose, Flexible; Brake Hose
- Position: Driver Side
- Replaced by: DGH9-43-820A
Mazda Flex Hose Part Number: DGH9-43-810
$326.03 MSRP: $434.79You Save: $108.76 (26%)Ships in 1-2 Business DaysProduct Specifications- Other Name: Hose, Flexible; Brake Hose
- Position: Passenger Side
- Replaced by: DGH9-43-810A

Mazda Brake Hose Part Number: VA40-43-810
$18.46 MSRP: $24.63You Save: $6.17 (26%)Ships in 1-2 Business DaysProduct Specifications- Other Name: Hose, Flexible; Flex Hose
- Position: Passenger Side
Mazda Brake Hose Part Number: VA40-43-820
$18.46 MSRP: $24.63You Save: $6.17 (26%)Ships in 1-2 Business DaysProduct Specifications- Other Name: Hose, Flexible; Flex Hose
- Position: Driver Side

Mazda Brake Hose Part Number: BDTS-43-820A
$20.03 MSRP: $26.70You Save: $6.67 (25%)Ships in 1-2 Business DaysProduct Specifications- Other Name: Hose(Left), Flexible
- Position: Driver Side
- Replaced by: BDTS-43-820B

Mazda Flex Hose Part Number: DGH9-43-980A
$21.44 MSRP: $28.59You Save: $7.15 (26%)Ships in 1-2 Business DaysProduct Specifications- Other Name: Hose, Flexible; Brake Hose
- Position: Passenger Side
- Replaced by: DGH9-43-980B
Mazda Flex Hose Part Number: DGH9-43-990A
$22.28 MSRP: $29.71You Save: $7.43 (26%)Ships in 1-2 Business DaysProduct Specifications- Other Name: Hose(Left), Flexible-Front; Brake Hose
- Position: Driver Side
- Replaced by: DGH9-43-990B

Mazda Flex Hose Part Number: BJS7-43-980A
$21.81 MSRP: $29.09You Save: $7.28 (26%)Ships in 1-2 Business DaysProduct Specifications- Other Name: Hose, Flexible; Brake Hose
- Position: Passenger Side

Mazda Brake Hose Part Number: BCKA-45-280
$22.36 MSRP: $29.83You Save: $7.47 (26%)Ships in 1-2 Business DaysProduct Specifications- Other Name: Pipe(Right), Brake-Front
- Position: Passenger Side

Mazda Flex Hose Part Number: GA7B-43-810
$23.13 MSRP: $30.83You Save: $7.70 (25%)Ships in 1-2 Business DaysProduct Specifications- Other Name: Hose, Flexible; Brake Hose

Mazda Flex Hose Part Number: 1F70-43-980
$22.35 MSRP: $29.81You Save: $7.46 (26%)Ships in 1-2 Business DaysProduct Specifications- Other Name: Hose, Flexible; Brake Hose
- Position: Passenger Side
- Replaces: 1F00-43-980
Mazda Flex Hose Part Number: 1F70-43-990
$23.06 MSRP: $30.75You Save: $7.69 (26%)Ships in 1-2 Business DaysProduct Specifications- Other Name: Hose(Left), Flexible-Front; Brake Hose
- Position: Driver Side
- Replaces: ZZP1-43-990, 1F00-43-990

Mazda Flex Hose Part Number: DGJ4-43-810
$23.25 MSRP: $31.00You Save: $7.75 (25%)Ships in 1-2 Business DaysProduct Specifications- Other Name: Hose, Flexible; Brake Hose
- Position: Passenger Side
- Replaced by: DGJ4-43-810A

Mazda Flex Hose Part Number: K011-43-810B
$25.90 MSRP: $34.54You Save: $8.64 (26%)Ships in 1-2 Business DaysProduct Specifications- Other Name: Hose, Flexible; Brake Hose
- Replaces: K011-43-810A, K011-43-810

Mazda Brake Line Part Number: LC62-43-650A
Product Specifications- Other Name: Pipe(Right), Brake-Rear
- Position: Passenger Side

Mazda Flex Hose Part Number: EC01-43-980D
Product Specifications- Other Name: Hose, Flex; Brake Hose
| Page 1 of 8 |Next >
1-20 of 157 Results
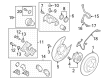
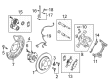
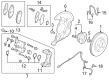
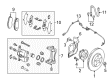
Mazda Brake Hose
Mazda Brake Hose directs pressurized brake fluid with minimal expansion for drivers to experience a sharp feel at the brake pedal while having reliable stopping power across the entire lineup. Mazda started manufacturing vehicles in 1931 and became famous for the fun rotary engine and later the fuel savings Skyactiv technology and sleek Kodo design that makes every car appear ready to attack. Mazda combines this styling with i-Activsense alerts, all-wheel drive optimized for rough trails and emerging hybrid systems that combine economy with fun driving dynamics. These strengths produce vehicles that feel agile and confident on any road, which supports the brand motto of putting the driver first. While the car itself is thrilling along, the Brake Hose works silently at every wheel, flexing with the suspension but enduring the heat and movement to maintain hydraulic pressure. Modern versions replace old rubber with stainless steel braided Teflon that does not swell, and the force goes straight to the calipers rather than being lost in hose expansion. Each Brake Hose is a crucial connection between the rigid pipes of the chassis and the moving hub, completing a closed hydraulic circuit that allows the pads to clamp the discs instantly. By keeping the line pressure firm, it strengthens Mazda performance goals of crisp response and safety for each Mazda driver, ensuring consistent deceleration session after session without fade.
You'll get great performance and real durability when you pick genuine OEM Brake Hose. Mazda builds these using high-quality materials and official factory methods to ensure they hold up mile after mile. You deserve that Mazda reliability without the headache of cheap knockoffs. It is easy to find exactly what you need in our huge inventory of genuine parts. Plus, every OEM part carries a real manufacturer's warranty for your peace of mind. You will love our low prices too. Order today and we will ship your brand-new parts fast. They often reach your door in just a few days.
Mazda Brake Hose Parts and Q&A
- Q: How often should you inspect the Brake Hose connecting the steel brake lines to the brake assemblies on Mazda 6?A:Open the vehicle, raise it up, and place on jackstands, approximately every six months, the flexible hoses between the steel brake lines and the front and rear brake assemblies; check them with regards to cracks, chafing, leaking, blistering, etc. as these are vital components of the braking system. A light and a reflecting mirror will also help in a complete check and a defective hose must be taken out and replaced with a new one. The first step is to make the ends of the hose clean, after which a flare-nut wrench is used to unscrew the tube nut to prevent rounding off of the corners, and then loosen the bolt(s) or clip(s) holding the hose. In the case of front brake hoses, unscrew brake line fitting and hold the fitting block in place with another wrench, remove mounting bolts and remove the hose on the caliper by unscrewing the banjo bolt. In the case of rear brake hoses, use the pliers to hold the bracket, then deattach the clip and the hose of the caliper. Disconnect hose to caliper, unscrew the sealing washers and screw the new brake hose in place with new sealing washers tightening the banjo fitting bolt to a prescribed torque. Turn the removal process back to fit the hose, make sure it is not twisted and make sure this hose does not come into contact with the suspension or steering parts and have an assistant push down on the vehicle and turn the steering wheel lock-to-lock as part of the inspection. When changing brake lines, it is important to use the right parts and never use copper tubing and buy steel brake lines at the dealer or auto parts store. Ready-made brake lines that have flared ends and fittings are offered and can be bent with a tubing bender to the required shapes. Make sure that the new line is securely held in place in the brackets with plenty of clearance of moving or hot objects. Once installed, verify the level of the master cylinder fluid, fill it, and Bleed the brake system, test the brakes thoroughly, and put the vehicle back into normal operation.
- Q: How often should you inspect the Brake Hose connecting the steel brake lines to the brake assemblies on Mazda 3?A:Check the brake system, and the flexible hoses are the most important and delicate components that should be carefully examined with a light and a mirror under every six months, when the vehicle is raised, and the hoses are safely fastened on jackstands, inspecting them for cracks, chafing, leaks, blisters and other damages. In case of any defects, a new hose should be used. First wipe off all the dirt on the ends of the hose and then unscrew using a flare-nut wrench the tube nut that attaches the hose to the frame bracket, unscrew the clip and then attach the hose. Then unbolt or unclip any hose in place on the other brackets and unscrew the hose off of the caliper. Install the new brake hose screwing it to the caliper and screwing the tube nut fitting to the recommended torque without twisting the hose. Ensure that there is no contact between suspension or steering elements and the hose, and start bleeding the brake system. When changing the brake lines be sure that you use the right parts as do not use copper tubing in any part of the brake system and buy steel brake lines at a car dealership or auto parts store. Ready-made brake lines that have flared ends of tubes and fitted components are ready and may be bent to the necessary shapes with a tubing bender. Make sure that the new line is firmly seated in the brackets with ample clearance of moving or hot parts, inspect the master cylinder fluid level, and add fluid where needed and carefully test the brakes and return the vehicle to normal operation.


Related Mazda Parts
 Mazda Timing Chain Tensioner
 Mazda ABS Control Module
 Mazda ABS Reluctor Ring
 Mazda Alternator Bearings
 Mazda Brake Caliper Piston
 Mazda Clutch Hose
 Mazda Coil Spring Insulator
 Mazda Crankshaft Seal
 Mazda Exhaust Nut
 Mazda Fog Light Relay
 Mazda Steering Knuckle
 Mazda Universal Joints
Browse by Model
2 Brake Hose 3 Brake Hose 323 Brake Hose 5 Brake Hose 6 Brake Hose 626 Brake Hose 929 Brake Hose B2000 Brake Hose B2200 Brake Hose B2300 Brake Hose B2500 Brake Hose B2600 Brake Hose B3000 Brake Hose B4000 Brake Hose CX-3 Brake Hose CX-30 Brake Hose CX-5 Brake Hose CX-50 Brake Hose CX-7 Brake Hose CX-9 Brake Hose GLC Brake Hose Miata Brake Hose Millenia Brake Hose MPV Brake Hose MX-3 Brake Hose MX-30 EV Brake Hose MX-5 Miata Brake Hose MX-6 Brake Hose Navajo Brake Hose Protege Brake Hose Protege5 Brake Hose RX-7 Brake Hose RX-8 Brake Hose Tribute Brake Hose