×
- Hello
- Login or Register
- Quick Links
- Live Chat
- Track Order
- Parts Availability
- RMA
- Help Center
- Contact Us
- Shop for
- Mazda Parts
My Garage
My Account
Cart
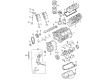
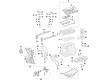
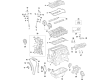
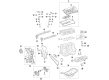
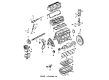
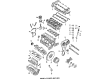
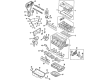
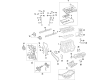
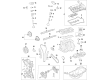
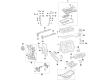
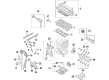
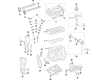
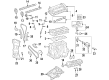
Genuine Mazda Piston
Engine Pistons- Select Vehicle by Model
- Select Vehicle by VIN
Select Vehicle by Model
orMake
Model
Year
Select Vehicle by VIN
For the most accurate results, select vehicle by your VIN (Vehicle Identification Number).
45 Pistons found

Mazda Piston & Pin Assembly Part Number: 1F61-23-200
$35.10 MSRP: $46.82You Save: $11.72 (26%)Ships in 1-2 Business DaysProduct Specifications- Other Name: Piston Set
Mazda Piston & Pin Assembly Part Number: 1F63-23-200
$43.85 MSRP: $58.49You Save: $14.64 (26%)Ships in 1-2 Business DaysProduct Specifications- Other Name: Piston Set
Mazda Piston & Pin Assembly Part Number: 1F62-23-200
$48.01 MSRP: $64.04You Save: $16.03 (26%)Ships in 1-2 Business DaysProduct Specifications- Other Name: Piston Set
Mazda Piston Part Number: PYY4-11-SA0
$67.79 MSRP: $90.41You Save: $22.62 (26%)Ships in 1-2 Business DaysProduct Specifications- Other Name: Piston Set
Mazda Piston Part Number: PYY3-11-SA0
$69.44 MSRP: $92.60You Save: $23.16 (26%)Ships in 1-2 Business DaysProduct Specifications- Other Name: Piston Set (1 Piston)

Mazda Piston Part Number: PEY6-11-SA0
$81.40 MSRP: $108.56You Save: $27.16 (26%)Ships in 1-2 Business DaysProduct Specifications- Other Name: Piston Set
- Replaces: PEY2-11-SA0A
Mazda Piston Part Number: PYY5-11-SA0
$84.85 MSRP: $113.16You Save: $28.31 (26%)Ships in 1-2 Business DaysProduct Specifications- Other Name: Piston Set
Mazda Piston Part Number: F220-11-SA0
$81.00 MSRP: $108.03You Save: $27.03 (26%)Ships in 1-2 Business DaysProduct Specifications- Other Name: Piston Set
Mazda Piston Part Number: BPZ0-11-SA0
$90.44 MSRP: $120.60You Save: $30.16 (26%)Ships in 1-2 Business DaysProduct Specifications- Other Name: Piston Set

Mazda Piston Part Number: B6Z2-11-SA0C
$91.40 MSRP: $121.89You Save: $30.49 (26%)Ships in 1-2 Business DaysMazda Piston Part Number: BPY1-11-SA0A
$91.40 MSRP: $121.89You Save: $30.49 (26%)Ships in 1-2 Business DaysProduct Specifications- Other Name: Piston Set
Mazda Piston Part Number: FPY1-11-SA0E
$85.35 MSRP: $113.83You Save: $28.48 (26%)Ships in 1-2 Business DaysProduct Specifications- Other Name: Piston Set
Mazda Piston Part Number: PEY9-11-SA0
$101.90 MSRP: $135.90You Save: $34.00 (26%)Ships in 1-2 Business DaysProduct Specifications- Other Name: Piston Set
Mazda Piston Part Number: PEY3-11-SA0A
$97.58 MSRP: $130.13You Save: $32.55 (26%)Ships in 1-2 Business DaysProduct Specifications- Other Name: Piston Set
Mazda Piston Part Number: PYY6-11-SA0
$106.78 MSRP: $142.39You Save: $35.61 (26%)Ships in 1-2 Business DaysProduct Specifications- Other Name: Piston Set
Mazda Piston Part Number: PEY1-11-SA0C
$101.91 MSRP: $135.92You Save: $34.01 (26%)Ships in 1-2 Business DaysProduct Specifications- Other Name: Piston Set

Mazda Piston Part Number: L3Y4-11-SA0
$110.56 MSRP: $147.45You Save: $36.89 (26%)Ships in 1-2 Business DaysProduct Specifications- Other Name: Piston Set
Mazda Piston Part Number: L3Y0-11-SA0
$111.89 MSRP: $149.21You Save: $37.32 (26%)Ships in 1-2 Business DaysProduct Specifications- Other Name: Piston Set
Mazda Piston Part Number: PEZ0-11-SA0A
$122.03 MSRP: $162.74You Save: $40.71 (26%)Ships in 1-2 Business DaysProduct Specifications- Other Name: Piston Set
- Replaces: PEZ0-11-SA0
Mazda Piston Part Number: LFY0-11-SA0A
$133.99 MSRP: $178.69You Save: $44.70 (26%)Ships in 1-2 Business DaysProduct Specifications- Other Name: Piston Set
| Page 1 of 3 |Next >
1-20 of 45 Results
Mazda Piston
Mazda Piston turns fiery fuel into smooth rotary power that launches every vehicle in the lineup in eager response, delivering drivers with instant power and signature zoomy feel. Mazda has made a name for itself with spirited handling, efficient Skyactiv engines, sculpted Kodo styling and helpful i-Activsense safety tech wrapped in cars that are spirited but also practical for daily life. The brand plays with electric and hybrid systems and its i-Activ AWD displays confident traction on twisting or rough roads, but Mazda keeps steering feedback crisp so that commutes remain fun. Inside, cabins combine obvious controls with quality materials to demonstrate that joy and comfort behind the wheel don't have to be mutually exclusive. At the center of that excitement is the robust Mazda Piston, which is made of lightweight aluminum alloy to move fast but stay cool thanks to targeted oil jets, with tight rings holding combustion pressure in place to make the optimal of thrust. Each Mazda Piston takes a precise path up and down the cylinder, sending that energy through the connecting rod to turn the crankshaft with very little vibration. By reducing the mass of the skirt and the slipper profile, this component contributes to the free rev-ability and fuel consumption reduction and emission reduction of the engine, which is a benefit that is felt in all types of cars from hatchbacks to sedans and SUVs, and all Mazdas will be able to deliver lasting performance and efficiency.
You'll get great performance and real durability when you pick genuine OEM Piston. Mazda builds these using high-quality materials and official factory methods to ensure they hold up mile after mile. You deserve that Mazda reliability without the headache of cheap knockoffs. It is easy to find exactly what you need in our huge inventory of genuine parts. Plus, every OEM part carries a real manufacturer's warranty for your peace of mind. You will love our low prices too. Order today and we will ship your brand-new parts fast. They often reach your door in just a few days.
Mazda Piston Parts and Q&A
- Q: How to locate Top Dead Center (TDC) for proper distributor installation in a Piston engine on Mazda MPV?A:The steps presuppose that the wires of the spark plugs and the distributor are installed properly. To find Top Dead Center (TDC) to install distributor, identify location of the piston by searching compression at the number one spark plug hole and arranging the ignition timing marks. TDC is the maximum point in which each piston travels to and this is on the compression stroke. It is important to align the piston to TDC to perform such activities as camshaft and timing chain removal. Prior to beginning, put the transmission in Neutral, use the parking brake and turn off the ignition system by removing the main electrical contacts off of the ignition coil. Bringing a piston to TDC Turn the crankshaft clockwise with a socket and ratchet on the crankshaft bolt, or a remote starter switch is efficient. Should it have an assistant, he can assist in turning on the ignition switch to Start in brief jolts as you go ahead using socket and ratchet. Record the terminal locating position of the spark plug wire number one on the distributor cap, and indicate the distributor body to be directly underneath it. Disconnect the cap and find the timing marks on the timing chain cover and match the TDC mark to the groove on the front pulley. Make sure the distributor rotor is aimed at the mark; otherwise, the distributor rotor could be 180 degrees away, which means that the number one piston is at TDC on the exhaust stroke. To rectify it, it is necessary to move the crankshaft one step clockwise, which would orient the rotor toward the mark. When the number one piston has reached TDC during the compression stroke, it is possible to determine the TDC of the remaining pistons by 180 degree turns of the crankshaft at a time and according to the firing order, the respective spark plug wire terminal locations on the distributor body can be indicated.
- Q: What steps must be taken before removing the piston and connecting rod assemblies on Mazda Protege?A:The cylinder head(s), the oil pan and the oil pump pick-up tube have to be removed before the removal of the piston and the connecting rod assemblies. First examine with your fingernail the existence of a ridge at the upper extreme of the travel of the ring, which is only about 1/4-inch below the top of any cylinder. In case of ridges they should be absolutely cleared using a ridge reamer before trying to disassemble the pistons otherwise they will be damaged. After clearing the ridges, invert the engine, that is, with the crankshaft upwards. Prior to removing connecting rods, verify the end play with feelers, and make sure that they slide freely between the first connecting rod and the crankshaft throw. When the endplay is greater than the given limit then new connecting rods might be needed and when new rods or a crankshaft is fitted, machining might be needed to achieve the appropriate endplay. Identify the connecting rod and caps; in case they are not marked, they should be marked with a center punch. Relax the connecting rod cap nuts one at a time until they can be removed manually, and remove the number one connecting rod cap and bearing insert without dropping the bearing insert. In order to cushion the crankshaft journal and cylinder wall when the piston is removed, slip a short length of plastic or rubber hose over each connecting rod cap bolt. Take off the bearing insert and drive the connecting rod/piston assembly out of the engine by pushing the top of the bearing with a wooden hammer handle. When resistance is experienced, make sure all the ridge is removed. Continue with the same procedure on the rest of the cylinders, turning the crankshaft as necessary so that the rod fits into the cylinder bore. Once removed, reintroduce the connecting rod caps and bearing inserts in each of the respective rods, and ensure the cap nuts or bolts are finger tight to avoid inadvertent injury to the bearing surfaces. The pistons should not be disconnected with the connecting rods.
Related Mazda Parts
 Mazda Turbocharger
 Mazda Blower Motor
 Mazda Camshaft Position Sensor
 Mazda Clutch Master Cylinder
 Mazda Distributor Cap
 Mazda Fuel Pressure Regulator
 Mazda Axle Shaft
 Mazda EGR Tube Gaskets
 Mazda Ground Cables
 Mazda Parking Brake Motor
 Mazda Power Steering Cooler
 Mazda Timing Cover Gasket