×
- Hello
- Login or Register
- Quick Links
- Live Chat
- Track Order
- Parts Availability
- RMA
- Help Center
- Contact Us
- Shop for
- Mazda Parts
My Garage
My Account
Cart
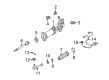
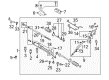
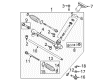
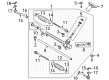
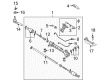
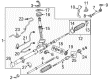
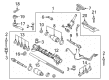
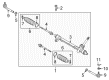
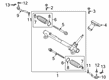
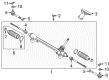
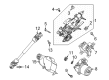
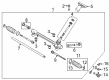
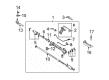
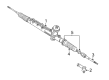
Genuine Mazda Rack and Pinions
Steering Rack- Select Vehicle by Model
- Select Vehicle by VIN
Select Vehicle by Model
orMake
Model
Year
Select Vehicle by VIN
For the most accurate results, select vehicle by your VIN (Vehicle Identification Number).
77 Rack and Pinions found

Mazda Steering Gear Part Number: BL4C-32-110A
$715.70 MSRP: $977.94You Save: $262.24 (27%)Ships in 1-2 Business DaysProduct Specifications- Other Name: Gear, Steering; Gear Assembly

Mazda Steering Gear Part Number: 1F21-32-110R-0A
$887.53 MSRP: $1208.41You Save: $320.88 (27%)Ships in 1-2 Business DaysProduct Specifications- Other Name: Reman, Gear Steering; Gear Assembly

Mazda Steering Gear Part Number: EH44-32-110C
$865.81 MSRP: $1183.04You Save: $317.23 (27%)Ships in 1-2 Business DaysProduct Specifications- Other Name: Gear, Steering; Gear Assembly
- Replaces: EH44-32-110A, EH44-32-110B

Mazda Steering Gear Part Number: NA1J-32-110F
$1404.32 MSRP: $1918.86You Save: $514.54 (27%)Ships in 1-2 Business DaysProduct Specifications- Other Name: Gear, Steering; Gear Assembly
- Replaces: NA1J-32-110E

Mazda Steering Gear Part Number: FE01-32-110D
$1574.76 MSRP: $2151.75You Save: $576.99 (27%)Ships in 1-2 Business DaysProduct Specifications- Other Name: Gear, Steering; Gear Assembly
- Replaces: FE01-32-110, FE01-32-110B, FE01-32-110C

Mazda Rack Part Number: GS3L-32-119
$48.01 MSRP: $64.04You Save: $16.03 (26%)Ships in 1-2 Business DaysProduct Specifications- Other Name: Rack, Steering Gear

Mazda Rack Part Number: KD31-32-119
$83.56 MSRP: $111.44You Save: $27.88 (26%)Ships in 1-2 Business DaysProduct Specifications- Other Name: Rack, Steering Gear

Mazda Pinion Gear Part Number: GJR9-32-12Y
$106.14 MSRP: $141.55You Save: $35.41 (26%)Ships in 1-2 Business DaysProduct Specifications- Other Name: Pinion, Steer Gear

Mazda Rack Part Number: B32H-32-119
$186.50 MSRP: $248.71You Save: $62.21 (26%)Ships in 1-2 Business DaysProduct Specifications- Other Name: Rack, Steering Gear

Mazda Rack Part Number: NE51-32-119
$187.84 MSRP: $250.50You Save: $62.66 (26%)Ships in 1-2 Business DaysProduct Specifications- Other Name: Rack, Steering Gear; Rack Gear

Mazda Rack Part Number: BBM4-32-119
$200.28 MSRP: $267.09You Save: $66.81 (26%)Ships in 1-2 Business DaysProduct Specifications- Other Name: Rack, Steering Gear

Mazda Rack Part Number: EG21-32-119
$200.53 MSRP: $267.42You Save: $66.89 (26%)Ships in 1-2 Business DaysProduct Specifications- Other Name: Rack, Steering Gear

Mazda Steering Gear Part Number: GJR9-32-110E
$239.41 MSRP: $319.29You Save: $79.88 (26%)Ships in 1-2 Business DaysProduct Specifications- Other Name: Gear, Steering; Gear Assembly
- Replaces: GJR9-32-110, GJR9-32-110C, GJR9-32-110D, GJR9-32-110A, GJR9-32-110B

Mazda Steering Gear Part Number: DB2P-32-110B
$234.49 MSRP: $312.71You Save: $78.22 (26%)Ships in 1-2 Business DaysProduct Specifications- Other Name: Gear, Steering
- Replaced by: DGDD-32-110

Mazda Steering Gear Part Number: GBEF-32-110
$252.06 MSRP: $336.16You Save: $84.10 (26%)Ships in 1-2 Business DaysProduct Specifications- Other Name: Gear, Steering; Gear Assembly

Mazda Steering Gear Part Number: KB7W-32-110A
$257.13 MSRP: $342.89You Save: $85.76 (26%)Ships in 1-2 Business DaysProduct Specifications- Other Name: Gear, Steering; Gear Assembly
- Replaces: KB7W-32-110

Mazda Rack Part Number: DFR5-32-110
$272.55 MSRP: $363.48You Save: $90.93 (26%)Ships in 1-2 Business DaysProduct Specifications- Other Name: Gear, Steering; Gear Assembly

Mazda Steering Gear Part Number: GHT2-32-110E
$279.39 MSRP: $372.59You Save: $93.20 (26%)Ships in 1-2 Business DaysProduct Specifications- Other Name: Gear, Steering; Gear Assembly
- Replaces: BJS7-32-110, BJS8-32-110, BJS7-32-110B, BJS7-32-110A, GHT2-32-110C, GHT2-32-110B, GHT2-32-110D, GHT2-32-110A, GHT2-32-110

Mazda Steering Gear Part Number: CC29-32-110R-0C
Product Specifications- Other Name: Reman, Gear Steering; Gear Assembly

Mazda Steering Gear Part Number: EC03-32-110R-0A
Product Specifications- Other Name: Reman Gear, Steering; Gear Assembly
| Page 1 of 4 |Next >
1-20 of 77 Results
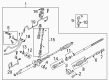
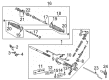
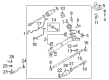
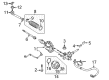
Mazda Rack and Pinions
Mazda Rack and Pinions convert all of the small movements made by the steering wheel into precise lateral movement at the front wheels, providing drivers with feedback and confident control. This little gear set conceals a straight rack bar and accurate pinion gear; their tight mesh allows no slop and keeps the vehicle pointed exactly where the driver wants it to go. With careful tuning of tooth profile and assist levels, the Rack and Pinions provide light effort in parking lots but hold steady on high-speed runs, thus the car feels agile without losing stability. Straight cut teeth are resistant to heat and wear, so the system remains durable for everyday trips as well as long journeys. Due to the lower weight of the Mazda Rack and Pinions compared to much heavier steering boxes, it also helps to distribute mass more evenly, creating better overall balance across the lineup. Mazda began building cars in 1931 and quickly became known for innovative rotary engines, a tradition of ingenuity that lives on today with Skyactiv powertrains engineered to sip fuel while still being an exciting sight. The company uses Kodo design that makes each body panel appear ready to pounce, i-Activsense technology such as lane keep and radar cruise to protect occupants, and experiments with electric drives and mild hybrids to meet the drive of the future. Mazda puts its i-Activ AWD through its paces on rough roads to ensure that grip is maintained when the weather turns foul, but every model still retains the fun-to-drive personality that makes the badge. By using this combination of forward-thinking ideas and lightweight engineering, Mazda ensures drivers remain engaged and confident on any journey.
You'll get great performance and real durability when you pick genuine OEM Rack and Pinions. Mazda builds these using high-quality materials and official factory methods to ensure they hold up mile after mile. You deserve that Mazda reliability without the headache of cheap knockoffs. It is easy to find exactly what you need in our huge inventory of genuine parts. Plus, every OEM part carries a real manufacturer's warranty for your peace of mind. You will love our low prices too. Order today and we will ship your brand-new parts fast. They often reach your door in just a few days.
Mazda Rack and Pinions Parts and Q&A
- Q: How to remove the rack and pinions from the steering gear on Mazda 3?A:To take out the rack and pinions, disconnect the cable in the negative terminal of the battery at first. Disconnect the ends of the tie-rods of the steering knuckles, with an Allen wrench to hold the stud in case the ballstud spins with the nut. Disconnect the lower control arm at the steering knuckle, and seal off the extremities to prevent loss and contamination of the fluid. Other models could contain a sheetmetal shield that is held by bolts that must be removed to access the fittings. Then, undo the mounting throughbolt of the rear engine and prop the crossmember using a floor jack. Unscrew the fasteners on the lower mount, and re-screw the upper mounting bolts, and drop the crossmember, with jackstands on each side. Be careful since the crossmember is very heavy and it should be supported by the jack. Disassemble the shield when fitted and the three rack and pinions fitting bolts and then lift the rack and pinions off the crossmember and out of the car. To install, go in reverse of the steps during removal, but make sure to line the matchmarks when hooking the rack and pinions input shaft up to the intermediate shaft U-joint. Install a fresh banjo bolt and sealing washers to the power steering pressure line, check all fasteners to the correct torque values and pour in the proper fluid in the power steering reservoir. Last but not least, drain the power steering hydraulic system and ensure a front-end check-up and adjustment when needed.
- Q: How to remove and install rack and pinions in the manual steering gear on Mazda B2200?A:In order to change and fit the rack and pinions, one should raise the front part and use jackstands to support the part before removing. The second step is to loosen the pinch bolt that attaches the wormshaft and the steering shaft coupling. Next, remove the cotter pin and nut which hold the pitman arm firmly in place in the center link, with a ball joint tool separating the pitman arm and the link. Unscrew the rack and pinions off the frame, and, should it be necessary to remove the pitman arm out of the sector shaft, first bring matchmarks to the relative positions of one to the other. To install, reposition the rack and pinions at the rear and connect the center link, with the following torque requirements which must be observed: 69 ft. lbs. (94 Nm) rack and pinions-to-frame, 38 ft. lbs. (52 Nm) wormshaft-to-steering shaft yoke, 130 ft. lbs. (177 Nm) pitman arm-to-sector shaft, and 43 ft. lbs. (58 Nm) pitman arm-to-center link.


Related Mazda Parts
 Mazda Alternator
 Mazda Driveshaft
 Mazda Air Bag
 Mazda Clutch Master Cylinder
 Mazda Instrument Cluster
 Mazda Power Steering Hose
 Mazda A/C Clutch
 Mazda Camshaft Thrust Plate
 Mazda Crankshaft Timing Gear
 Mazda Harmonic Balancer
 Mazda Spark Plug Wire
 Mazda Throttle Body Mounting Gasket
Browse by Model
2 Rack and Pinions 3 Rack and Pinions 323 Rack and Pinions 5 Rack and Pinions 6 Rack and Pinions 626 Rack and Pinions 929 Rack and Pinions B2000 Rack and Pinions B2200 Rack and Pinions B2300 Rack and Pinions B2500 Rack and Pinions B2600 Rack and Pinions B3000 Rack and Pinions B4000 Rack and Pinions CX-3 Rack and Pinions CX-30 Rack and Pinions CX-5 Rack and Pinions CX-50 Rack and Pinions CX-7 Rack and Pinions CX-9 Rack and Pinions Miata Rack and Pinions MPV Rack and Pinions MX-30 EV Rack and Pinions MX-5 Miata Rack and Pinions MX-6 Rack and Pinions Navajo Rack and Pinions Protege Rack and Pinions Protege5 Rack and Pinions RX-7 Rack and Pinions RX-8 Rack and Pinions Tribute Rack and Pinions